Monday, April 25, 2011
April 2011 Papertrey Blog Hop
It's time for another Papertrey Blog Hop. This one is for the men and boys in our lives. The theme is to make a masculine card or project.
This also fits the Make it Monday challenge for this week (line frame)! Score!
I made this card for my dear nephew's 2nd birthday this week. It was hard to choose between the new rocket set and this Frog Hop set. I kept it pretty simple and flat since it has to be mailed. I did some slight shading and made some spots on the frog with Copic markers. The black frame is drawn by hand.
All supplies from Papertrey Ink unless noted.
Stamps: Boy Basics: Frog Hop
Paper: white, ocean tides, ripe avocado, black, bright green (unknown)
Ink: Ripe Avocado, Black
Other: Frog Hop dies, limitless layers circle dies, rick rack die, Cuttlebug Bubbles embossing folder, Zig marker, ruler
Labels:
Blog Hop,
Frog Hop,
Limitless Layers,
Papertrey Ink
Wednesday, April 20, 2011
Gift Card Thanks
Paper Dolls Challenge #34
Okay so I'm a month behind on this challenge. Yes, I know there really is no time limit but I told myself that I would get each Paper Dolls challenge done within the first month. I'm already falling behind.
This is for Cecilia's gratitude challenge. You can read about it HERE. Basically we are to create a simple thank you card and use a background stamp.
I chose to stamp the large flower from the 2008 PTI anniversary set Everyday Classics as my background image. I also wanted to have the bright Springy color of New Leaf included so I used it as my card base and for the leaf die cut. This is a Sizzix die that I really love.
I stamped an image from Mat Stack 2 on the Mat Stack 1 die cut. I didn't intend for the image to turn out like that but I liked the look of my mistake:) I first stamped the image in versamark and then New Leaf ink because I wanted to emboss the frame. Well, it didn't work, but I was left with a cool looking distressed frame. I added a little flower gem from Michael's and some lace trim to finish off the card front.
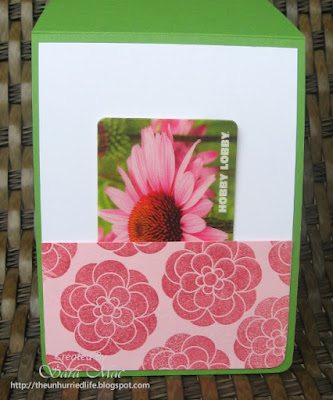
Since I needed to make a thank you card to go along with a gift card I was giving, I just turned this card into a gift card holder by creating a little pocket from a leftover piece of the background paper. Here's the inside:
All supplies from Papertrey Ink unless stated
Stamps: Everyday Classics, Mat Stack 2, Mat Stack 4 (sentiment)
Paper: New Leaf, white, Sweet Blush
Ink: Sweet Blush, New Leaf, Hollyhock (CTMH), Versamark
Other: Mat Stack 1 die, Sizzix leaf die, gem flower, rhinestone, lace, corner rounder
Sunday, April 17, 2011
ODBDSLC57 No Coloring
Have you seen the latest release from Our Daily Bread Designs? I loved so many of their new stamps. I broke down and purchased some scriptures and this Bird & Butterfly Labels set. It coordinates with Spellbinders Labels 18!
This week's challenge from the ODBD blog is create a project with no coloring. You can read about it HERE. Not a problem for me since I'm not much of a colorer. Here's my card:
The base is True Black cs cut from the largest Labels 18 die. I sponged Hibiscus Burst around the image panel and added a little Martha Stewart doily behind it for more detail. Pretty quick & easy card.
Stamps: Bird & Butterfly Labels (ODBD)
Paper: true black, hibiscus burst, white (PTI)
Ink: hibiscus burst (PTI), black (memento)
Other: Sheer White Polka Dot ribbon (PTI), Labels 18 (spellbinders), doily (MS)
Labels:
Our Daily Bread designs
Thursday, April 14, 2011
Golden Anniversary
This card was made by special request. One of my husband's co-workers asked me to make a 50th Wedding Anniversary card with specific wording; therefore, the sentiment was computer generated.
Since she didn't make any specific color requests I chose this textured pp from DCWV's Old World Mat Stack. I've had it for years and seem to forget about it. I embossed some flourishes on it using Ranger's super fine detail gold EP. Love that stuff.
After I cut the sentiment panels out with my Labels 10 nesties I traced the smaller one with a gold paint pen. Then added some tiny gold pearls.
Here's the inside with the requested wording:
It was so nice to get a special order card. She loved the end result and actually paid me double what I had asked for! Can't argue with that:)
Since she didn't make any specific color requests I chose this textured pp from DCWV's Old World Mat Stack. I've had it for years and seem to forget about it. I embossed some flourishes on it using Ranger's super fine detail gold EP. Love that stuff.
After I cut the sentiment panels out with my Labels 10 nesties I traced the smaller one with a gold paint pen. Then added some tiny gold pearls.
Here's the inside with the requested wording:
Labels:
Fancy Flourishes
Saturday, April 2, 2011
HEC #16 + CPS 211
Ted has issued his challenge for April and I wanted to be sure to play along. It was very easy to get started right away on this one because I had my purple and green scraps out from the last card. So HERE is Ted's clever challenge this month:
I already had the flowers cut from Simply Chartreuse paper since I was playing around with making these flowers. You can see this post for photo steps on how I made these. I just stamped the centers in purple ink with the flowers from Sending You. I also embossed the purple layer and white card base with my canvas / linen impression plate.
My four "somethings" are:
- You must make a birthday card (in honor of his birthday this month).
- It must be mainly purple and green (his favorite colors).
- It must contain four of something (since he's turning 44).
I already had the flowers cut from Simply Chartreuse paper since I was playing around with making these flowers. You can see this post for photo steps on how I made these. I just stamped the centers in purple ink with the flowers from Sending You. I also embossed the purple layer and white card base with my canvas / linen impression plate.
My four "somethings" are:
- 4 leaf sprigs
- 4 rhinestones
- 4 words in my sentiment
I used the CPS sketch for this week for my layout.
All supplies Papertrey Ink unless stated
Stamps: Sending You
Paper: Simply Chartreuse, Royal Velvet, White
Ink: Rainbow (memories)
Other: rhinestones , spellbinders blossom two dies, scor-pal, canvas impression plate, copic marker for small rhinestone
Labels:
HEC,
Papertrey Ink,
Sending You
Friday, April 1, 2011
Card Aisle Inspiration + PPD #35
My online friend and fellow Paper Doll Laurie is hosting a great challenge on her blog. It's all about finding inspiration for our card creations from store bought cards. Perfect timing for this challenge because I actually set aside one of my birthday cards for this very purpose. Of course, who knows how long it would have taken me to actually make a card from it if Laurie hadn't issued this challenge.
Here is the store bought card from one of my best friends:
And here is my take on the above card. Truthfully, I like the store bought one better.
I had a lot of fun figuring out what kind of flower I wanted to use on this card. I finally decided to use my Spellbinders Blossom Two Nestabilities dies (largest and second smallest dies). I grabbed some Royal Velvet scraps and went to work. Here are some pics of the steps I did to make the flowers. Click on the photos to enlarge.
I decided to flip the little flower over when layering it on the bigger flower. I liked the dimension that it gave the blossom. Since the flowers and the leaves were all cut from scraps I had in my scrap box, this fits Katie's Papertrey Paper Dolls challenge this week too!! You can check it out HERE. I could probably submit just about every card I make for Katie's challenge. I'm so frugal that I make sure to use every last scrap I can before cutting into a new sheet of paper.
That's it from me. Whew, it felt good to be crafty today. Hope you all have a great weekend!
All supplies from Papertrey Ink unless stated.
Stamps: Delightful Dahlia
Paper: Spring Moss, Royal Velvet
Ink: Spring Moss, Vintage Cream, Rainbow (memories)
Other: spellbinders blossom two nesties, delightful dahlia dies, brad from Target $1 spot
Here is the store bought card from one of my best friends:
And here is my take on the above card. Truthfully, I like the store bought one better.
I had a lot of fun figuring out what kind of flower I wanted to use on this card. I finally decided to use my Spellbinders Blossom Two Nestabilities dies (largest and second smallest dies). I grabbed some Royal Velvet scraps and went to work. Here are some pics of the steps I did to make the flowers. Click on the photos to enlarge.
1. Die cut flowers |
2. Scored from petal tip to opposite petal tip |
3. Cut between each scored petal |
4. Folded each petal inward after cutting |
I decided to flip the little flower over when layering it on the bigger flower. I liked the dimension that it gave the blossom. Since the flowers and the leaves were all cut from scraps I had in my scrap box, this fits Katie's Papertrey Paper Dolls challenge this week too!! You can check it out HERE. I could probably submit just about every card I make for Katie's challenge. I'm so frugal that I make sure to use every last scrap I can before cutting into a new sheet of paper.
That's it from me. Whew, it felt good to be crafty today. Hope you all have a great weekend!
All supplies from Papertrey Ink unless stated.
Stamps: Delightful Dahlia
Paper: Spring Moss, Royal Velvet
Ink: Spring Moss, Vintage Cream, Rainbow (memories)
Other: spellbinders blossom two nesties, delightful dahlia dies, brad from Target $1 spot
Labels:
Delightful Dahlia,
Papertrey Ink
Subscribe to:
Posts (Atom)